Esparcs Full Demo
ESparcs is an ATS, & RMS software created by CodeMarks.
In this write up we aim to educate our users or potential users about the
features that ESparcs has, and how we have built it to work for you. To know
the pricing details and other details regarding ESparcs click here.
In
this write up you will find a detailed step by step guide to our workflow.
ESparcs has the following roles:
- Super Admin
- Business Heads
- Recruitment Manager
- Recruiter
- Vendor
- Candusinidate
- Client
Contents
Add Admin Users
Once we setup ESparcs for you, our team will send you your ‘Super Admin’ credentials that you can
use to login. Once logged in follow the steps as shown in the above video to create different
admin users with different roles. Now each user that you have created can go back to the login
page and login using the credentials that ‘Super Admin’ gave them.
All the videos on this page have shown all the specified functionality from the ‘Super
Admin’ perspective. You can perform all the specified functions as limited to your role, through
your own login. There might however be a slightly different user interface.
Greeting Assessments
Creating assessments is quite simple. We’ve got 3 types of tests – MCQ’s, Psychometric test, &
Single answer tests. In the above video we show you how to create a simple MCQ test. Single
answer tests are more or less the same. For Psychometric tests however, we recommend that you
get in touch with our team to have this done for you.
Once you have created the assessments that you require, post your requisitions. You must
then link assessments to these requisitions. This simply means that every candidate that applies
a particular job or is shortlisted for a particular job will be able to take all the assessments
linked to it. The scores of the all the tests that a candidate has taken will be visible on
their resume.
Posting Jobs-Individually or in bulk
The above video would show you how to post a single job. The following video would show you how
to import as many jobs as you like into ESparcs from an excel sheet. Remember to make sure that
you enter the ‘company name’, ‘designation’, ‘description’ , ‘salary low’, ‘salary high’ ,
‘degree’, ‘experience’, & ‘skills’ for each post, as they are required fields. In the video you
will also see how to link tests that you have created to the jobs you have posted.
In the case that you need to integrate an API that handles assessments for you, just get in
touch with us and we will get it done for you. If you also want to custom create tests for a
particular set of skills you can reach out to us.
You have no restriction with the number of requisitions that you can add
simultaneously.
Every Job that you post is goes on to our SEO friendly public listing page, to help you
source candidates through search engines. You can always get in touch with us to help you with
candidate sourcing, in the case that you might need it.
Want to post across job platforms and get applications straight into ESparcs? Reach us
to integrate this API for you at a minimal cost.
Recruitment Manager Creates Planner & Business Head Approves it
In this video a recruiter would be able to understand how to create a planner for a Job Post, and
a business head would be able to understand how to approve of a planner and view the event
calendar.
Only if a requisition has a planner approved, can a recruitment manager assign teams to
that Job Post, view statistics on the job posts and more. Recruiters are not expected to start
their work until a requisition or job post has been approved by the business head.
Create & Assign Teams To Requisitions
This video shows you how a ‘recruitment manager’ can create ‘recruiter’ teams and assign teams to
a requisition. Every assigned recruiter gets an email saying that he has been assigned to a
particular job post. A single recruiter can be in multiple teams and a single team can have
multiple jobs assigned to them.
Statistics for jobs basically tell you how well a team is performing. Currently ESparcs
does not go into individual recruiter performance analysis but if you require it, we can get it
done for you at a minimal cost. It is a very minor customization and wouldn’t take very long to
implement.
Recruiters Import Candidates In Bulk (or) Register them individually
Recruiters can now import candidate resumes from an excel sheet into ESparcs, as shown in the
video. After bringing these candidates into ESparcs, you can choose whether or not to send them
a mail invitation to come and explore job opportunities with your firm. You can then decide
whether to create user profiles for these candidates with instructions on how to reset their
passwords and apply to the jobs that you are hiring for.
If you choose to send out mail invitations to these candidates you must not import more
than 100 candidates at a time. If you try to send out mail invitations to more than 100
candidates per hour, it could result in denial of the mailing service to your firm, and your
mails would be considered as spam. For bulk E-mailing, we have integrated with Mail Chimp. You
can click on the ‘campaigner’ button and start building your mailing list there instead of doing
it here.
E-mail Campaigner
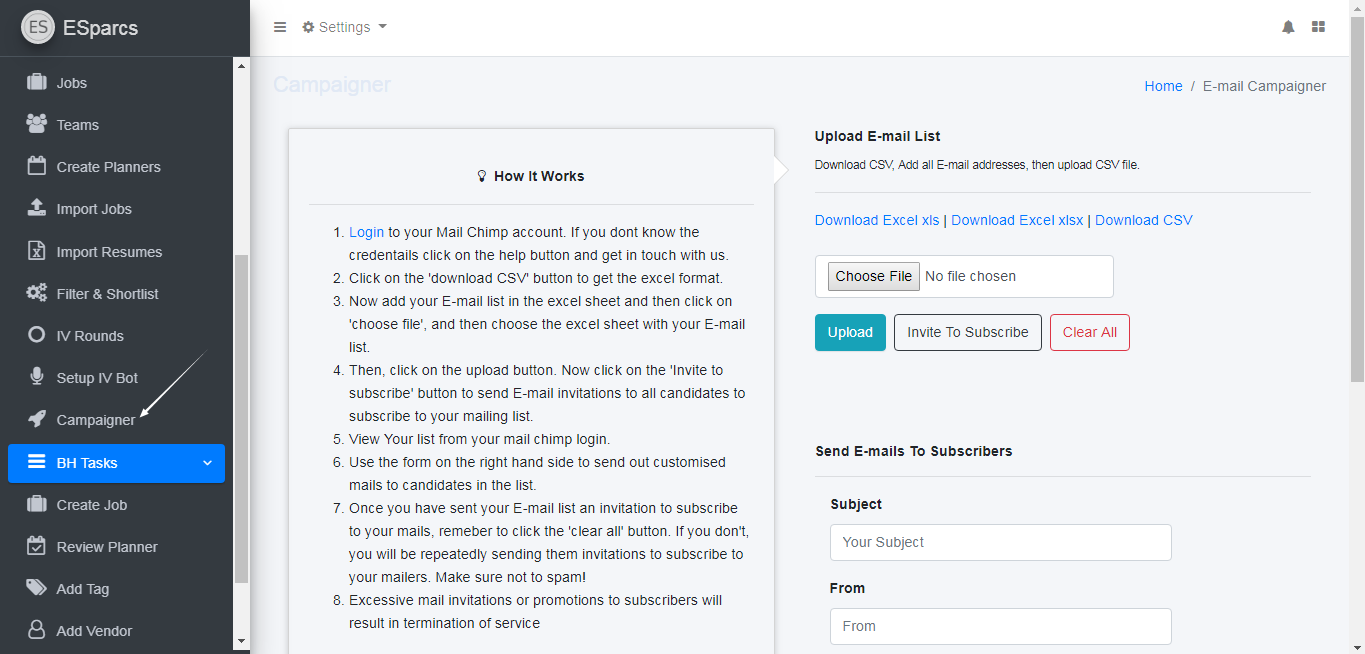
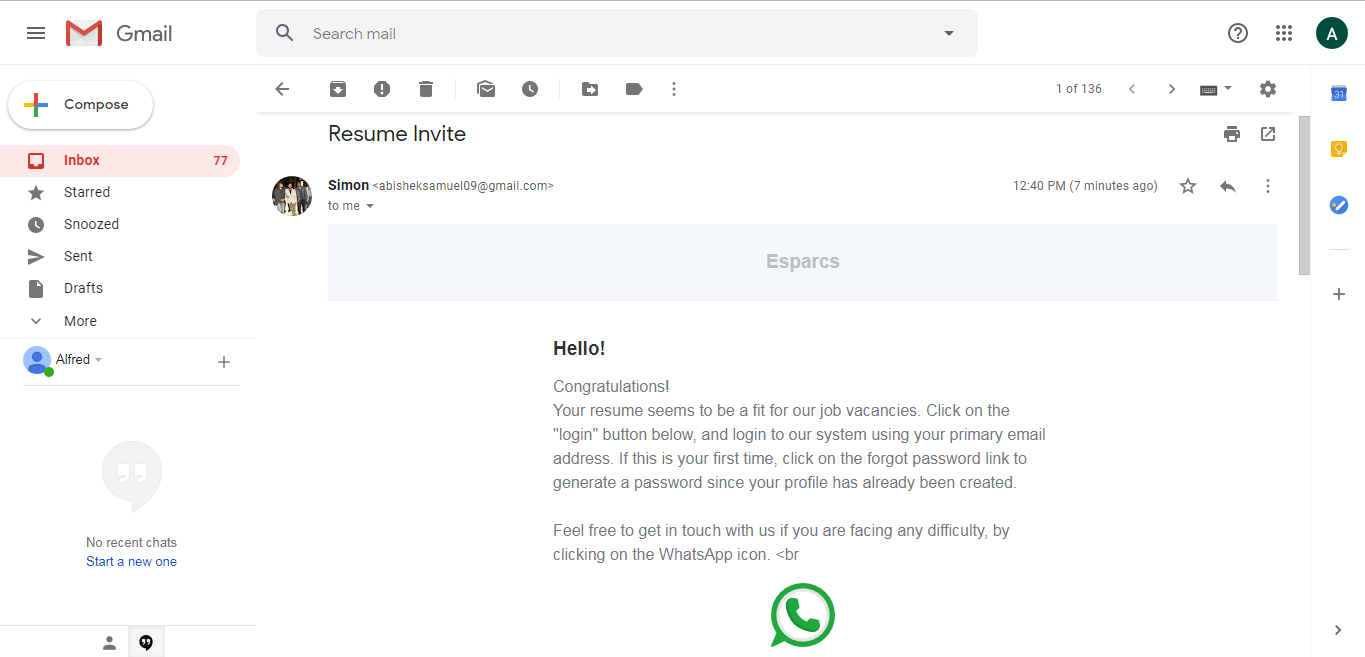
When you Invite Candidates (not with the campaigner tool). They receive and E-mail that looks something like this.
E-mail Invite Template
Create Classification Tags & Tag Candidates
Classification tags are created by the ‘business head’. They are used to create revenue standards by which incoming and outgoing revenue can be tracked. It it also used to classify candidates based on the value they will bring into your firm. For a more detailed explanation feel free to get in touch with us. The video should give you an idea on how you can add a classification tag to a candidate. You can also add this tag to a Job Post, to see revenue statistics on it.
Move Candidates Through Interview Round
ESparcs exhibits a simple drag and drop to move candidates from one round to the next, each candidates being a card and each round being a deck. You can also select all and perform bulk operations wherever necessary.
Some of the links that you see in the card are integrated API’s. You can request us to add or remove them based on what you need.
We help you get in touch with each of these candidates n WhatsApp by clicking the WhatsApp link on the card. You can then conduct voice or video interviews with the candidates of your choice.
Don’t forget to hit the ‘sync’ button after every drag and drop or your changes wont be saved!
Filter & Shortlist Candidates From Existing Candidate Pool
Search for the candidates of your choice with our search filter. Remember, the search results in the that turn up on the right side may contain candidates that have been shortlisted for other jobs, but haven’t been placed. On the left side you will find candidates that have scored well in the assessments that you had linked to the jobs that they have applied for. You will also find applicants for the said job, that haven’t taken any of the assessments.
step 7.3
Create Offer & Accept Offer
Upload the candidate offer letter for each requisition as shown in the video. Then, the candidate would need to accept the offer as shown in the video. He will also need to upload all his documents for verification. The recruiter can then verify all his documents and decide whether to place him, untag him or reject him.
If he is un-tagged he will go back to the list that you see when you click on ‘ivrounds’.
Note: If you want to add the DocuSign API to get the candidates digital signature on the offer. We can integrate it for you in 7 days at a minimal cost.
step 8
Add Vendor & Assign to Requisition
‘Business Head’ & ‘Recruitment Manager’ can create a new vendor, and assign them to a requisition as shown in the video.
step 9
Create Chat-Bot To Automate Interviews
‘Recruitment Managers/ can request us to setup a chat-bot that would scan through a candidate’s resume, scores and understand a candidates language capabilities and then decide whether to move the candidate to the next round. The chat-bot is generally designed to assess and move candidates from the screening round to the personal interview round.
Watch the video below to see how this works! This video has audio, and so cannot auto play. You’ll have to click the play button.
step 10
Reports
Teams performance reports, and overall business performance reports are visible to ‘Recruitment Managers’, ‘Business Heads’ & ‘Super Admins’.
Revenue statistics are only visible to ‘Business Heads’ & ‘Super Admins’
Below is a video of how it looks.